Weaving double weave, or two separate woven layers, on a rigid heddle loom has been studied, written about in books, and demonstrated extensively in online videos. It need not be very difficult, but it is more time-consuming than executing the same technique on a multi-harness floor loom.
My students have been asking for a class in using double heddles on the rigid heddle loom, which is something I do a lot, to create a double density sett in order to weave with finer yarn. They also want to learn to do double weave on the rigid heddle. This is not something I typically do, since I have floor looms for weaving complicated structures. But I figured I should make a double weave sampler so that I can instruct my students in this technique with some degree of competence. The basic technique requires two heddles and two pick up sticks.
For my sampler I used two 7.5 dent heddles for an overall sett of 15 ends per inch. I warped my rigid heddle loom by tying a red and a blue yarn together and drawing loops of the doubled yarn through the slots of one heddle. I threaded this heddle by moving one of the red yarns from each slot to an adjacent hole. I moved that heddle to the back heddle position, which would weave the red layer on the bottom. I put my second heddle in the front heddle position and threaded one blue yarn in a slot and one blue yarn in a hole of this heddle. The red threads pass through another slot; the next blue yarn goes in the same slot as the red threads, and then a blue yarn goes through the next hole. The blue layer (threaded on the front heddle) is woven on top of the red layer (back heddle).

The red threads in holes on the back heddle weave the lower layer. 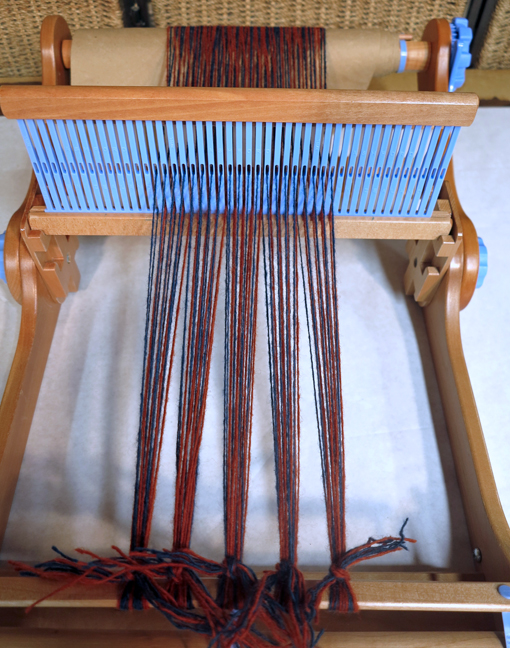
The blue threads in holes on the front heddle weave the top layer.
Each layer requires two sheds: for the lower layer, one is made with the heddle in the down position; the other shed is made by a pick up stick under the back heddle/red slot threads. The upper layer sheds are made with the front heddle in the up position alternating with a pick up stick under the blue slot threads. The two sticks are positioned between different layers of warp, so they can both be shoved to the back of the loom when not in use, and they can move forward independently without interfering with each other.
The heddle sequence is 1) Red pick up stick, 2) back heddle in down position, 3) front heddle in up position, 4) Blue pick up stick. I followed the steps in The Weaver’s Idea Book, p. 203, by Jane Patrick, who surely gives clearer instructions than I am doing here.
My sampler has three sections. The first (lower) section is the two layers woven completely separately and open on both sides.
The next (middle) section is closed on one side and open on the other. One portion of this section is woven with two interlocking wefts, so the front and back are separate colors. Another portion is woven with one (red) weft. A piece woven like this could be opened out like a book, forming a double width fabric.
The final (top) section is closed on both sides and open at the top edge, so it forms a pocket.

Some time ago I wove a double-width wool and mohair blanket or throw on a 4-shaft floor loom. The width on the loom was 30 inches, so it opened to a 60 inch wide blanket. It was done in plain weave, with one layer woven on shafts 1 and 2; the other layer woven on shafts 3 and 4. All woven in solid black, no pick up sticks were required. It does not photograph well, so just imagine a large and cozy black rectangle. If I wanted to do future double weave projects, this is most likely the way I would go.
Another double weave project that I wove on a floor loom had designs created by picking up lower layer threads with a pick up stick, while 4 shafts wove the ground cloth. To create this on a rigid heddle loom would require at least 2 more pick up sticks: two to work the two layers of ground cloth and the other two to pick up the contrasting design. It was slow work on the floor loom and it should go without saying this would be a very slow process on the rigid heddle.

I realize I am fortunate to be able to choose the right tool for the job, and I believe the multi-harness loom is the better choice for double weave. But for the space- or budget-challenged, a rigid heddle loom can be a workable option. Take advantage of the many books and videos that will help you choose the right job for the tool you have, and keep on weaving!